Butternut Pear Soup

butternut soup with croutons.png

The fall breeze is in the air early this year (though I’m still counting a a few more weeks of beach days here and there—-please summer don’t leave us yet!). Even though today is hot, signs of the coming of fall are solid as the first butternut of the season that arrived on my doorstep today. And I can’t resist—it’s butternut soup time!

This is a slight adaptation from this Simple Butternut Soup Recipe I shared a couple of years ago.

Ingredients:

1 medium-sized butternut squash

1 or 2 pears, chopped

2 cups prepared veggie broth or 2 cups water and one cube veggie bouillon

1 can of coconut milk (13.5 oz)

2 large shallots, sliced or 2/3 cup chopped onion

2 tbs fresh ginger (grated)

salt and pepper to taste

microgreens and/or parsley

lemon

croutons

Instructions:

The Butternut Squash—

You can either cut it up into slices in a hurry (the thinner, the quicker it cooks through) and put in a pan with a little oil, a splash of water and a well-fitting lid to cook about 10 minutes until soft. The downside to this is that you need to scrape the cooked butternut off of each slice afterwards if you want the soup to be smooth.

or

Cut it in half, scoop the seeds out and roast it on a baking sheet at 400 degrees for about 40 minutes until soft. My new discovery—You don’t really need oil to do this (although, the crispiness of a little olive oil on top is delicious). Cover with foil if you want it to soften faster. Overall, this method takes longer but scooping the butternut out is a lot faster than scraping it slice by slice. And you’re free to do other things for the 40 minutes it takes to bake.

The Soup—

In a pot, add the cooked butternut squash (scooped out with no peel), broth or water and veggie bouillon, coconut milk, shallots or onion, grated ginger, salt and pepper. Mash with a potato masher (or use an immersion blender) and stir until smooth.

Top with microgreens and/or parsley, croutons and a squeeze of lemon juice and enjoy!

Roasted Bell Pepper and Tomato Soup

bell pepper tomato soup and toppings.png

INGREDIENTS

2 bell peppers, sliced and with seeds removed

olive oil

1 onion, chopped

1 or 2 carrots, chopped

2 or 3 stalks celery, chopped

2 to 4 cloves garlic

1 clamshell cherry tomatoes (or 2 to 3 large tomatoes, or 4-6 smaller ones)

1 1/2 quarts vegetable broth or water plus 2 cubes bouillon

herbs, fresh or dried—try any combination of basil, thyme, oregano and/or marjoram

salt and pepper to taste

TOPPINGS— Try serving with croutons, tortellini, crusty bread or even tortilla chips, and of course, pile on this week’s purple kohlrabi microgreens (or any microgreens you’ve got around) and parsley (or other chopped leafy greens like kale or arugula) to feed the good stuff to your gut microbiome! Don’t forget the slice of lemon or lime on the side.

INSTRUCTIONS

Pan roast the bell pepper in a bit of olive oil for a few minutes, until the skin starts to blister and it gets brown in spots.

Add the onion and saute for a few more minutes until it’s a bit transparent and also starts to brown

Add the carrots, celery, garlic, salt and pepper with a bit more olive oil and saute a couple more minutes

Add the tomatoes and stir fry another minute or two.

Add the broth or water and bouillon and herbs and cover and let simmer for 10 to 20 minutes.

Use an immersion blender to puree the soup or remove from heat, let cool a bit and then puree in a blender.

Serve with your choice of croutons, crusty bread, tortellini or tortilla chips (so many directions to take it!) and top with microgreens, parsley or other leafy greens, and a slice of lemon or lime on the side.

Chana Masala

chana masala.png

As is always my aspiration, this version of Chana Masala seeks to be simple and flexible and comes with the disclaimer that I am experimenting outside of my culture here, so I don’t pretend to represent the following recipe as authentic Indian cuisine! It’s chicana hands here, in southern California, appreciating the Indian traditions that trickle down and expand my world. That said, I invite you to use up this week’s Swiss chard and last week’s leftover tomatoes to make this yummy, nourishing dish. Note: it goes great over rice, so plan ahead for that.

INGREDIENTS

3 to 4 cups cooked garbanzos a.k.a. chickpeas (1 cup dry garbanzo makes 3 cups cooked and it takes a couple of hours to cook up a pot of garbanzos. Just put the dried garbanzos in a pot with plenty of water. Bring to a boil, then cover and lower the heat so it simmers away. You know they’re done when you taste one and it’s cooked through and not chalky or crumbly)

1 onion (if it’s really small, then go with 1 and a half or two. And yes, you can sub in your bunch of green onions here!), chopped

3 to 4 cloves garlic, chopped

3 tbs garam masala powder or substitute with curry powder if that’s what you’ve got

1 tsp turmeric

2 tbs coriander

2 tbs fresh ginger, chopped

1 tsp salt or 1 cube of veggie broth diluted in a 1/4 cup water

2 to 3 large tomatoes (or 2 to 3 cups cherry tomatoes—measure first then chop), chopped

1/2 of a large bunch of swiss chard, finely chopped

1 to 2 tbs lemon juice

fresh chile (optional, leave it out or on the side if you’re going for a kid-friendly dish)

cilantro and/or microgreens

salt and pepper to taste

INSTRUCTIONS

Saute onion for a few minutes, until translucent and a bit browned.

Add garlic and spices (garam masala or curry powder, turmeric, coriander and ginger) and sauté for another minute. If you know you want it spicy, then you could add the chile here.

Add the garbanzos and saute for a minute or two.

Add the tomato and salt or veggie broth and saute for a couple of minutes.

Stir in the chard, cover and let it cook for another minute.

Turn off the heat and stir in the lemon juice & add salt and pepper to taste.

Serve over rice, top with cilantro and/or microgreens and enjoy!

Salad with Citrus Vinaigrette

Yes, this is the raw good stuff that feeds your microbiome. If you want to learn more about this ‘gut biome’ we’re talking about, listen to this good, old Gut Feelings episode from Radio Lab.

Yes, this is the raw good stuff that feeds your microbiome. If you want to learn more about this ‘gut biome’ we’re talking about, listen to this good, old Gut Feelings episode from Radio Lab.

This flexible recipe seeks to be easy, quick and use what you’ve got. Pick and choose from the suggested ingredients list, adjust the quantity to suit your tastes, and arrive at your reliable favorite or change it up each time.

The Raw Greens:

salad mix and/or lettuce and/or kale and/or cabbage and/or microgreens and/or any other green you wish to eat up raw!

Rinse, strain, chop and toss together.

The Dressing:

chopped green onion and/or shallot and/or garlic or none of this at all (C:)

juice of and orange and/or lemon and/or grapefruit

vinegar (champagne or white wine or balsamic or apple cider)

olive oil

salt and pepper

Mix all your dressing ingredients in a jar and drizzle over your greens.

If you want extra crunch, add any or all of these extras:

carrot and/or kohlrabi and/or radish

pepitas and/or pecans and/or almonds and/or sunflower seeds

Enjoy this fresh masterpiece and take a moment to feel good knowing that you’re feeding that diverse microsmos that does so much to sustain you— your gut biome.

Grilled Corn on the Cob

One of life’s simple delights—in my book—is biting into a crispy elote right off the grill. Taking that bite and knowing this corn came from field that never sprays any pesticide and isn’t genetically modified, makes this experience worth savoring even more. That’s why this week’s corn from Huakama Produce is so special. Grown locally, in season and clean as can be! (Thank you Tina!) Here’s a few tips for grilling it up:

If you want to grill the corn whole with the husk on, then it’s a good idea to soak it first (anywhere between 30 minutes to a few hours), just so the husks don’t burn so quickly. You can peel back the husk without tearing them off, rub off the corn silk, then wrap the husks back around the corn and then soak. This method gets you a more moist grilled corn on the cob, if that’s your preference. Place on the grill for about 15 minutes, rotating it a couple of times.

If you want to grill it without the husk, you’ll get a more smoky, crispy corn on the cob and it will cook faster. Place directly on the grill and turn every few minutes until it’s cooked to your liking.

Season with salt, pepper, chile, lemon or whatever else is your jam!

Tomato Basil Zucchini Noodles

tomato basil zucchini noodles.png

This summer combination is so natural—the tomato, basil and zucchini…they all come in season at the same time and taste so good together!

Ingredients

1 or 2 zucchinis, transformed into ‘noodles’ with a potato peeler or other fancy gadget

1 large tomato or 2 small ones, sliced

a large handful of basil, with leaves removed from the stem

2 or 3 cloves garlic, sliced

olive oil

pasta of your choice (optional, you could keep it super light and just use the zucchini noodles…I personally, like to mix them with spaghetti for a more substantial meal)

salt and pepper to taste

INSTRUCTIONS

1. If you’re planning to mix in pasta, start the water for the pasta first (follow instructions on the package) and it will probably be boiling and ready for the pasta by the time you finish prepping the veggies.

2. Prep the veggies (grate zucchini with potato peeler, slice up the tomato and garlic, remove the leaves from the basil stem).

3. In a small pan, saute the garlic in olive oil for a minute (or less!), then add the tomato and saute another minute or two. Add salt and pepper.

Remove from heat and toss with the zucchini noodles and pasta.

Dandelion Pesto

dandelion pesto.png

INGREDIENTS

2 cups dandelion greens

2 to 3 garlic cloves

1/2 to 3/4 cups pepitas

1/2 to 2/3 cup olive oil

1/4 cup nutritional yeast

1/2 tsp salt

1 or 2 tbs lemon juice

INSTRUCTIONS

As with our previously-posted, more traditional Basil Pesto Recipe, here are a few ways to do this.

Method 1: To destress (if you’re not in a hurry!) get your molcajete out (your mortar and pestle for those of you not familiar with the Spanish term with Nahuatl roots) and put your strength into grinding. I recommend you do the garlic first, then your seeds of choice, and add the greens last, a little bit at a time. Your setting yourself up for frustration if you pile the greens in—it’s just a lot harder to grind so many layers of leaves at a time. For me, it’s unsatisfying! But if you add two or three leaves at a time, you can really take pleasure in the meditative transformation of the beautiful leaves into a bright paste. After the garlic, seeds and greens is ground, scrape it out into a dish and then add the salt, nutritional yeast and, finally, the olive oil. This is where you decide how thick to make your pesto. If you don’t want it so think, add more oil.

Method 2: Put all ingredients in a food processor or blender. Or, put it in a slightly oversized dish (like a 2-cup pyrex container, for example) and use the immersion blender directly in the dish. This is not the fastest, but by far, the easiest clean up if you can manage to keep the immersion blender immersed below the level of olive oil so that it doesn’t spray everywhere when you start to blend.

Final tip: It took me a long time to assimilate our italian roommate’s discovery that the way to mess up pesto is by adding too much garlic. I love garlic so that was hard to hear. I think he’s right though because the power of raw garlic can easily overwhelm. (This from a person who’s mouth waters at the thought of taking a bite of the fresh whole garlic clove!) So, the tip is—When in doubt, add less garlic.

So many ways to use this pesto—Serve as a dip with crusty bread, crackers, chopped veggies or even your eggplant or zucchini fries; over your favorite protein; add a spoonful to your soup; top your quiche or frittata with it, or…to use this week’s CSA items—grill up some beets and purple potatoes and smother them with pesto OR…make yourself a grilled portobello ‘burger’ (yes, basically just grill the mushroom) and dress it with this fresh and healthy pesto and a handful of broccoli microgreens!


Potato Kale and Onion Frittata

Inspired by this Epicurious recipe (pictured above), my version is (as usual!) simplified: I skip the blanching of the kale, and use whole eggs instead of egg whites because I can’t stand to throw half the egg out.  Photo Credit:  John Valiant

Inspired by this Epicurious recipe (pictured above), my version is (as usual!) simplified: I skip the blanching of the kale, and use whole eggs instead of egg whites because I can’t stand to throw half the egg out. Photo Credit: John Valiant

This is a new recipe for me, but from the looks of it, it will fall into my personal comfort foods category and it’s a great way to pack the kale in.

INGREDIENTS

1 to 1 1/2 cups onion, chopped (bulb or bunching all will work—last week’s spring bulbing onions would be delicious here!)

2 to 4 cloves garlic

2 cups kale, chopped

2 cups potatoes, chopped and boiled until cooked through

3 to 4 eggs (for a vegan version, try replacing the eggs with 1 3/4 cups chickpea flour a.k.a. garbanzo flour a.k.a. gram flour, 1/4 cup nutritional yeast, 1 tsp baking powder and 1 tsp garlic powder and 2 cups water…obligatory props to our beloved Oli who introduced me to this genius idea—I couldn’t get enough of his vegan frittata)

1 tsp paprika

1 tsp ground coriander (optional, but delicious!)

salt and black pepper to taste

microgreens (optional, but also delicious!)


INSTRUCTIONS

Preheat oven to 400.

In a pan (cast iron, if you’ve got it, but at minimum a pan or skillet that you can use in the oven later—so no plastic parts!), saute the onion with little olive oil over medium-high heat for a few minutes until translucent and slightly browned.

Add the garlic and saute another minute.

Add a little more olive oil along with the potatoes and kale.

Whisk the eggs with the salt and spices and pour over the potatoes, kale, onions and garlic. Cook over medium heat for 1 minute.

Then transfer pan (again, no plastic here!) into oven and bake at 400 for about between 8 and 20 minutes. The time depends on the size of your pan and, thus, how thick your frittata is. You’ll know it’s ready when the eggs are set (you know, cooked through and not runny anymore). If you want to crisp the top, transfer the pan down to the broiler for the last minute or two.

Slice and serve up and garnish with a big bunch of microgreens.

Minestrone Soup

minestrone.png

This flexible recipe is a lovely meal all on its own. It’s specially exciting if you have some pesto and croutons to top it.

Ingredients:

2 tbs olive oil

1 onion, chopped

3 or 4 carrots, sliced

2 celery sticks (optional, but add lots of good flavor)

4 to 6 cloves garlic

1/2 cup tomato paste, or 1 cup of tomato sauce, or 3 medium tomatoes, finely chopped

2 potatoes and/or 1 or 2 zucchini or other summer squash and/or green beans, or other seasonal veggies, chopped

2 cups spinach and/or kale and/or turnip greens and/or beet greens or other seasonal greens

1 tbs fresh oregano or 1 tsp dried oregano

1 tbs fresh thyme or 1 tsp dried thyme

2 or 3 bay leaves

8 to 10 cups water and 3 cubes vegetable bouillon or 8 cups liquid vegetable broth

1 tsp salt or more as desired

1 tsp pepper (optional, but cooks in to add wonderful flavor)

1 cup pasta (elbow, rotini or shell pasta works well)

2 to 3 cups cooked white beans (black eyed peas work well, too!)

Optional Toppings—

lemon juice

parmesan or nutritional yeast

parsley

basil

microgreens

INSTRUCTIONS

In a pan, saute onions with olive oil for a few minutes, when starting to become translucent, add chopped garlic, carrots and celery and saute for 3 more minutes. Add a splash of water if it’s looking too dry

In a pot, add the water and bouillon or vegetable broth, cooked beans, sauteed onion, carrots, celery and garlic, chopped potatoes/zucchini, summer squash/green beans, herbs and spices, cover and bring to a medium boil for 10 or 15 minutes, until the potato is cooked through

Add pasta and greens and boil for a few more minutes until the pasta is cooked.

Serve hot and serve with any or all of the optional toppings for your steamy enjoyment!

Tamales de Acelga con Queso y Rajas

This huge pile of greens disappears magically into the masa and keeps the tamal from drying out.

This huge pile of greens disappears magically into the masa and keeps the tamal from drying out.

This evolving recipe of mine seeks to honor the generations of hands (since pre-columbian times) that have turned the gift of corn into masa, and that into the mouth watering genius that is the tamal. At the same time, I am trying to shift this dish in my own more recent culture, from what was the ritual feast, prepared in abundance and enjoyed exclusively on holidays towards a bit less exhausting, more frequent, nourishing delight, packed with greens and less grease…so that I can eat them and feed them to my little ones for breakfast AND lunch without guilt! In short, here’s a small batch recipe you can make by yourself or with your kids in a couple of hours that blends the leafy greens into the masa, and wraps them in more leafy greens to boot. Still an indulgence, but with more healthy veggies packed in so you don’t feel gross afterwards. It’s still a project but it’s not impossible to do on your own!

And I can’t speak of tamales without thinking of my dad. I will save his fresh corn tamal recipe in all it’s sweet and salty indulgence for the beautiful rituals that are fewer and farther in between.

INGREDIENTS

For the masa—-

The ratio of masa to greens is 2 to 1. I love my carbs, but it feels good to know there’s more than just that in there.

The ratio of masa to greens is 2 to 1. I love my carbs, but it feels good to know there’s more than just that in there.

5 cups masa flour (I use the organic yellow corn masa flour from Gold MIne Natural Foods...I will warn you, it’s tough finding organic masa at an affordable price!)

2 1/2 tbs baking soda

2 1/2 cups finely chopped greens (spinach, chard, bok choy, amaranth leaves, purslane a.k.a. verdolagas all work great)

2 ½ cubes bouillon in 2 cups of water (I use vegetable bouillon)

2 tbs oregano

½ tbs thyme

2 tbs chile pasilla powder

1/2 tsp salt

1/4 tsp ground cumin

The finished product—another thing I love about wrapping tamales in greens instead of corn leaves is that I can eat it all; and In our current broken food system where it’s so hard to find corn that isn’t doused in chemicals, I love being able to wrap my tamales in something organic grown right out of our back yard.

The finished product—another thing I love about wrapping tamales in greens instead of corn leaves is that I can eat it all; and In our current broken food system where it’s so hard to find corn that isn’t doused in chemicals, I love being able to wrap my tamales in something organic grown right out of our back yard.

1/4 tsp garlic powder

1/4 tsp onion powder

1/2 tsp pepper

2 tbs paprika

3 cloves garlic, chopped

1 onion, chopped

1 tomato or ½ cup tomato sauce or salsa

½ cup olive oil or non-hydrogenated vegetable shortening

For the filling—

queso oaxaca or mozarella cheese, cut into strips about an inch wide and 2 inches long

2 or 3 chile poblano or anaheim (optional, I leave these out in a few for a less spicy option for kids)

For wrapping—

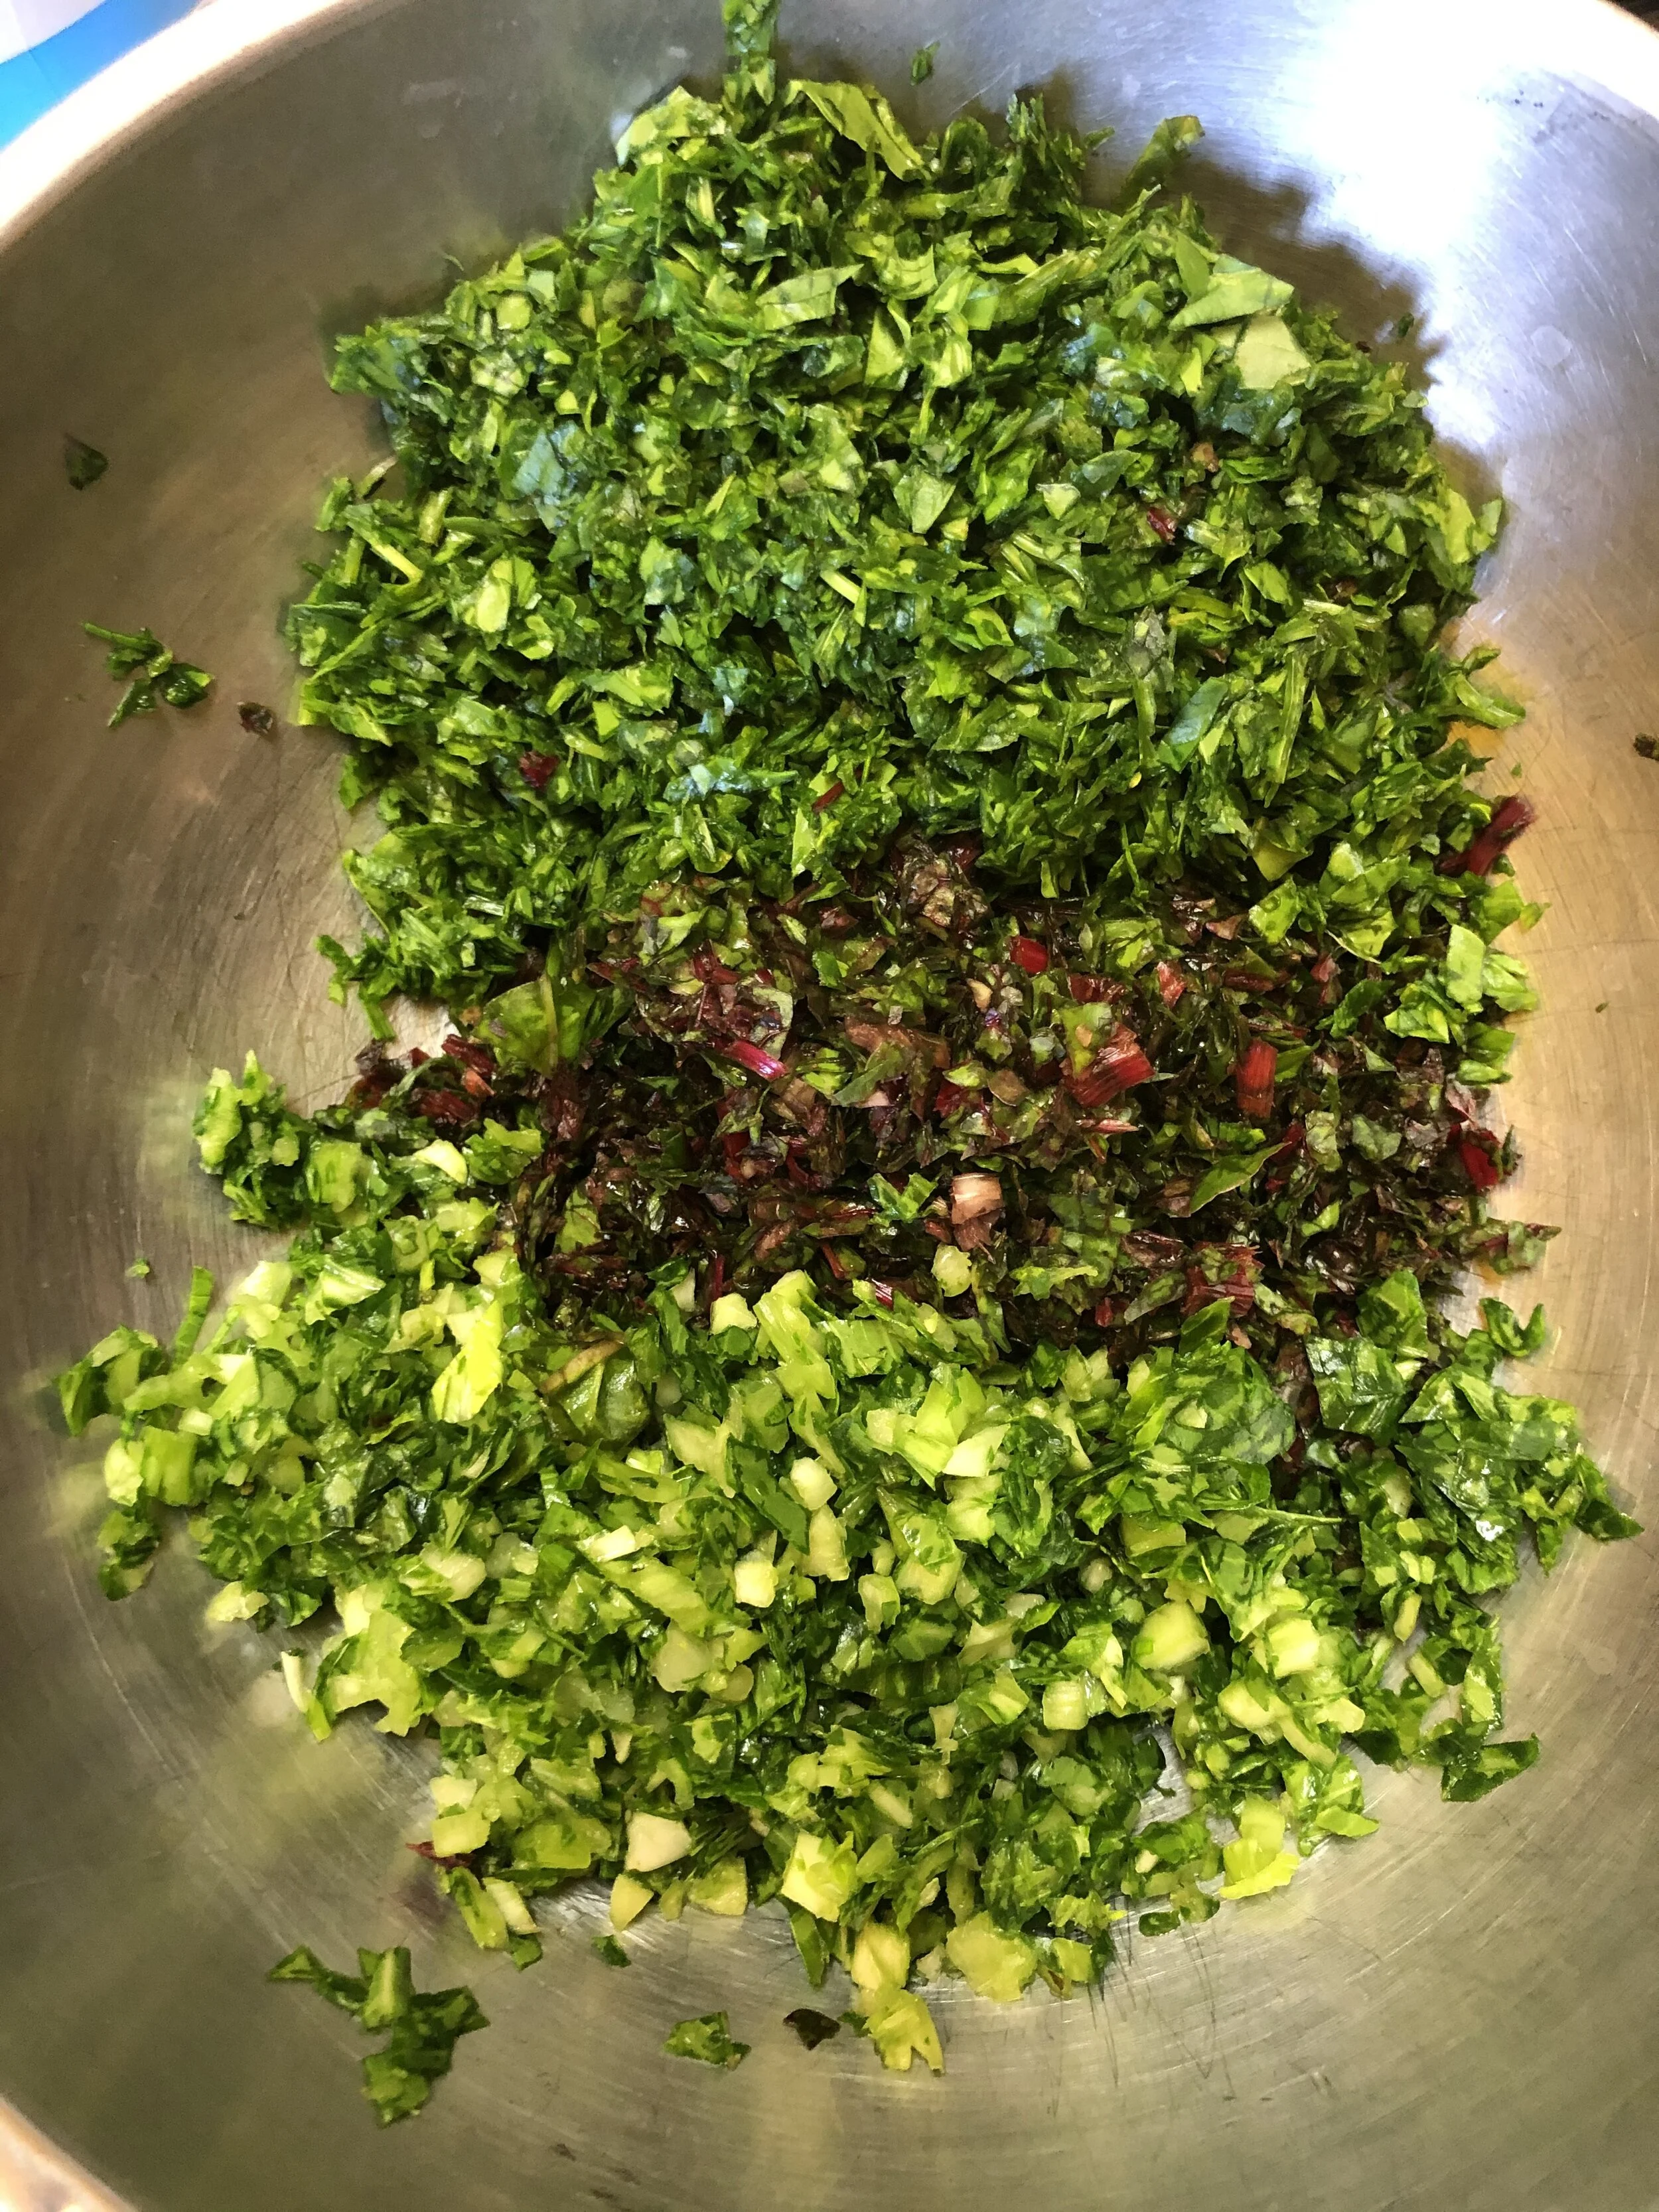
Large and flexible leafy greens. Chard is my favorite for this purpose. Collard leaves also work well. Other leaves I’ve used—beet greens, amaranth greens (on years that they are big and beautiful). I think even some kale or Napa cabbage could work!

INSTRUCTIONS

1. Roast the poblano or anaheim peppers in a pan over medium-high heat until they blister and turn mostly black. Remove from heat and place in a bowl with a lid so they ‘sweat’. Many people do this step in a plastic bag. This freaks me out because I think the heat releases nasty chemicals from the plastic that I would rather not eat. My alternative has been a bowl with a lid or placing the hot chiles on a silicone baking mat and folding the mat over the chiles for a few minutes.

2. In the same pan, put a drizzle of olive oil and saute the onions and garlic and the whole tomato, if you are using a fresh tomato. Stir the onions occasionally and cook until translucent and slightly browned. Flip the tomato around occasionally to char it on all sides. Remove from heat and let cool.

3. Heat up 2 cups of water enough to dissolve the bouillon cubes and let cool a bit

4. While everything cools, mix the masa, baking powder and dry spices in a large mixing bowl.

5. In a blender, puree the onion, garlic and tomato with about half of the vegetable broth (enough liquid to allow blender to work well, not so much that you overflow!)

6. Mix finely chopped greens into the masa. Then add the mix from the blender and the rest of the liquid vegetable broth. Finally, work in the olive oil or vegetable shortening. Use your hands to work it all in. It may feel a bit dry, but the leafy greens you’ve worked in will release moisture as you cook.

7. Returning to the sweaty chiles, remove the thick translucent and charred peel that should be partially flaking off. I am not obsessive about this, but most people find it annoying to chew. I say, it’s more fiber! When you are satisfied with this step, slice open the chile and remove the stem and seeds (again, I am not obsessive about the seed removal, but I may be spicier than you like if you let too many seeds remain). Slice the remaining chile into strips.

8. It’s wrapping time! Get your steamer ready. If you don’t have a dedicated steamer, basically a metal rack that fits inside your pot to keep your tamales lifted an inch or two above the water, then you can rig one with some aluminum foil. My grandma showed me this trick:

Fill a large pot with four inches of water more or less. Then, take a big piece of aluminum foil and twist it to make a sort of flexible cylinder that you can coil around to sit in the bottom of your pot. You’ll need to make a few of these. Once you start wrapping, you place the tamales so they sit on the coils (or your steamer rack)

Now that your steamer pot is ready, take a serving spoon and scoop out some masa. Spread it on one of your large leafy greens. Put two or three strips each of cheese and chile, then fold the masa over the stuffing to seal it in. Finally, wrap the leaf around your tamal as the beautiful gift that it is! If you find your leaf excessively large, then grab some scissors and cut the excess and set it aside for another tamal. If you find your wrapping leaf too small, then grab another leaf and finish it off. It’s a challenge sometimes, finding the best way to wrap each tamal so that it holds once you set it down. You can stack tamal on top of tamal, so long as the lid will still sit tightly over everything once you finish.

When you’re done wrapping, place pot over medium-high heat and steam for 1 hour.

Enjoy!